These instructions guide you in creating your own custom list views or reports, on systems upgraded to the latest Wurk release. These can be used to build charts you can add to your Dashboard, so you can see quick summary info at a glance.
Every list view (anything that looks like a list of records with the blue bar across the top) in Wurk is considered a report, which you can customize, save, and export. This can save you time when you check the same information repeatedly and you need it sorted, filtered, and displayed in a particular way. To customize these views for yourself, you start with a standard view and work with the data options to tailor it to your needs and then save it as a customized report. The reports you customize can be saved under My Info>My Reports. For example, you may want to see your timesheets sorted by Pay Period and filtered by Overtime Hours. In this case, you would create a custom report of the My Time screen with a special view and filter, and you would save this report so you can check it again later. If you are a Manager, you can see examples of the standard reports available to authorized users under My Team>Reports, HR>Reports, and Payroll>Reports. You can customize these for yourself and save them for later use. Once you customize and save a report, finally, you can set it to display a Chart view that you can then add to your dashboards.
To see a standard Wurk report and customize it, you can open one of the dashboard tabs from the Home page and click-through on the title of the chart. This will take you to the report that was the source of the chart. From there, you can create a custom version of the report, save it, and hook it to the chart that shows on the dashboard you came from.
Charts in Wurk are responsive, meaning that they automatically update as data in the system changes. In other words, if you add a chart to one of your dashboards and when the report it comes from has new information, that chart will automatically show the new data.
START HERE
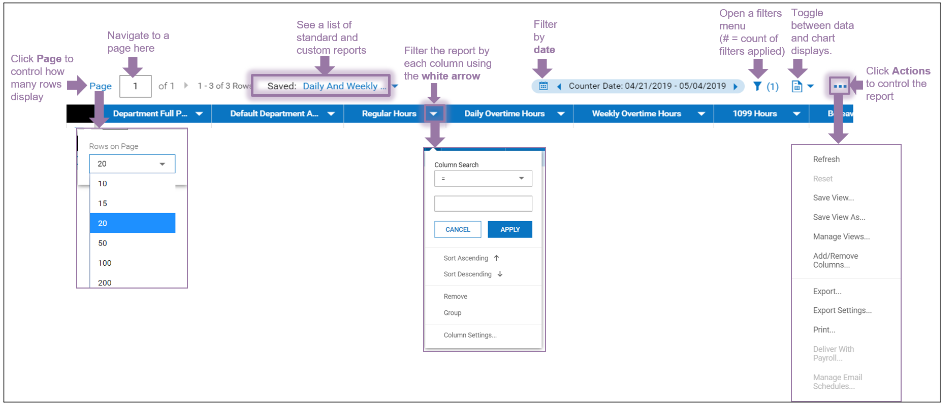
1. From any list view in Wurk that you wish to customize, start by using the common actions shown here to tailor and control how the data displays.
If you are upgrading from a previous release of Wurk, list views have been enhanced and redesigned for power users. The most noticeable changes are in the options ribbon at the top.
Page numbering, which helps you quickly advance through long lists by page;
Filtering “pills” (shaded blue) at the top of the report, to help you work with filters in fewer clicks;
Actions 
2. In the Actions 
3. Click apply to see your column settings take effect in the chart.
4. Then continue to customize the report using the Filter 

Filtering Lists or Reports
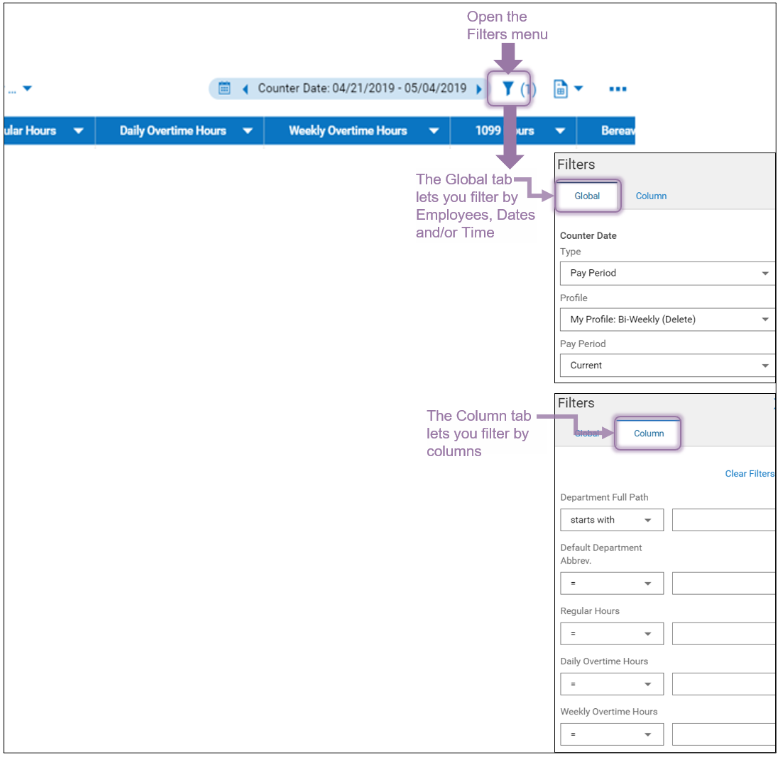
5. Clicking the Filter 
- The Global tab shows list elements used throughout the system.
- The Column tab lets you filter your list by options in each column on the list.
Alternatively, you can still sort and filter the report one column at a time as shown below.
Additional Report Actions: Sharing, Exporting, Printing and Saving
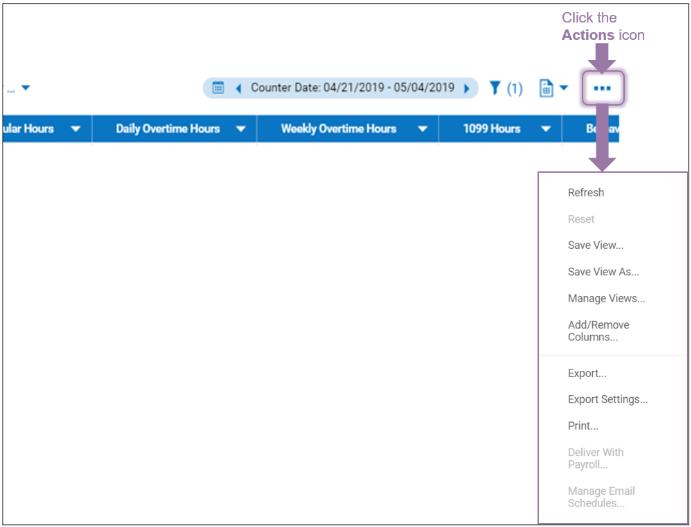
6. Clicking the Actions 
-
Refresh to update the list with newly added or changed filters.
-
Reset to remove filters and revert the list back to saved settings.
-
Save View to save the list as you have it currently customized, or if it has already been saved, you can use this option to revert to the list’s saved settings (only for lists saved to My Lists).
-
Save View As to save a copy of the list (for example, if you are viewing one that was shared with you).
-
Manage Views to see a system-wide list and shared lists, including those you saved.
-
Add/Remove Columns to edit columns in the list, such as adding or removing standard columns, and adding, editing, or removing custom columns.
-
Export to save the list as a file outside of Wurk.Export Settings to access Advanced Report settings, such as renaming columns and choosing which columns to export.
-
Print to print the list (choose a printer).
Note: Deliver With Payroll and Manage Email Schedules are only available to some users, and only once you have saved a version of the list.
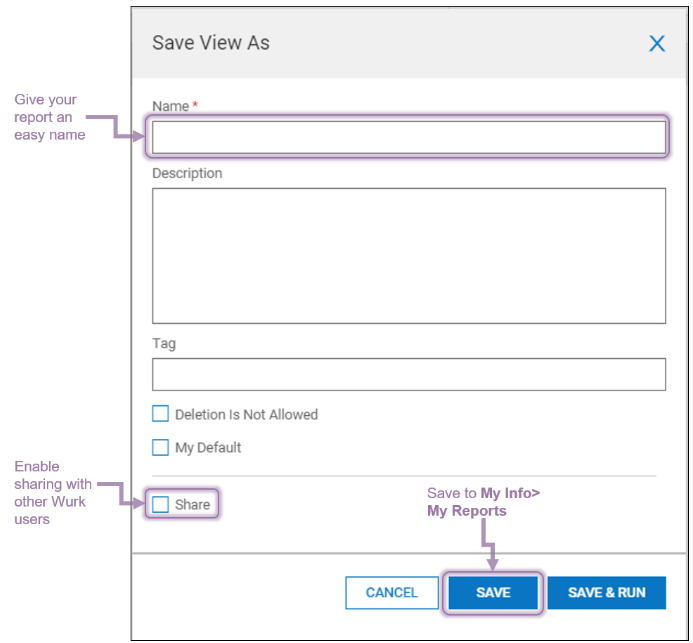
7. Once you have customized your list or report, click Actions>Save View. and the popup window, specify the list name, and so on. Keep in mind that you want to be able to easily find this report later, for example, when adding a Chart view to it or hooking it to one of your Dashboards.
If you click the Share checkbox for a report or dashboard view, you will be able to Share the list with other users in Wurk. Once you share the report with them, they can then save it, and then it will appear for them under their My Info>My Reports>My Saved Reports menu option on the main menu.
8. Confirm SAVE to finish.
9. To share the report with other users, simply guide them to the report under My Info>My Reports (give them the name you created for the report).


